Design Pattern
Hooks Pattern
React 16.8 introduced a new feature called Hooks. Hooks make it possible to use React state and lifecycle methods, without having to use a ES2015 class component.
Although Hooks are not necessarily a design pattern, Hooks play a very important role in your application design. Many traditional design patterns can be replaced by Hooks.
Class components
Before Hooks were introduced in React, we had to use class components in order to add state and lifecycle methods to components. A typical class component in React can look something like:
class MyComponent extends React.Component {
  /* Adding state and binding custom methods */
  constructor() {
    super()
    this.state = { ... }

    this.customMethodOne = this.customMethodOne.bind(this)
    this.customMethodTwo = this.customMethodTwo.bind(this)
  }

  /* Lifecycle Methods */
  componentDidMount() { ...}
  componentWillUnmount() { ... }

  /* Custom methods */
  customMethodOne() { ... }
  customMethodTwo() { ... }

  render() { return { ... }}
}
A class component can contain a state in its constructor, lifecycle methods such as componentDidMount and componentWillUnmount to perform side effects based on a component’s lifecycle, and custom methods to add extra logic to a class.
Although we can still use class components after the introduction of React Hooks, using class components can have some downsides! Let’s look at some of the most common issues when using class components.
Understanding ES2015 classes
Since class components were the only component that could handle state and lifecycle methods before React Hooks, we often ended up having to refactor functional components into a class components, in order to add the extra functionality.
In this example, we have a simple div that functions as a button.
function Button() {
  return <div className="btn">disabled</div>;
}
Instead of always displaying disabled, we want to change it to enabled when the user clicks on the button, and add some extra CSS styling to the button when that happens.
In order to do that, we need to add state to the component in order to know whether the status is enabled or disabled. This means that we’d have to refactor the functional component entirely, and make it a class component that keeps track of the button’s state.
export default class Button extends React.Component {
  constructor() {
    super();
    this.state = { enabled: false };
  }

  render() {
    const { enabled } = this.state;
    const btnText = enabled ? "enabled" : "disabled";

    return (
      <div
        className={`btn enabled-${enabled}`}
        onClick={() => this.setState({ enabled: !enabled })}
      >
        {btnText}
      </div>
    );
  }
}
Finally, our button works the way we want it to!
1import React from "react";2import "./styles.css";34export default class Button extends React.Component {5 constructor() {6 super();7 this.state = { enabled: false };8 }910 render() {11 const { enabled } = this.state;12 const btnText = enabled ? "enabled" : "disabled";1314 return (15 <div16 className={`btn enabled-${enabled}`}17 onClick={() => this.setState({ enabled: !enabled })}18 >19 {btnText}20 </div>21 );22 }23}
In this example, the component is very small and refactoring wasn’t a such a great deal. However, your real-life components probably contain of many more lines of code, which makes refactoring the component a lot more difficult.
Besides having to make sure you don’t accidentally change any behavior while refactoring the component, you also need to understand how ES2015 classes work. Why do we have to bind the custom methods? What does the constructor do? Where does the this keyword come from? It can be difficult to know how to refactor a component properly without accidentally changing the data flow.
Restructuring
The common way to share code among several components, is by using the Higher Order Component or Render Props pattern. Although both patterns are valid and a good practice, adding those patterns at a later point in time requires you to restructure your application.
Besides having to restructure your app, which is trickier the bigger your components are, having many wrapping components in order to share code among deeper nested components can lead to something that’s best referred to as a wrapper hell. It’s not uncommon to open your dev tools and seeing a structure similar to:
<WrapperOne>
  <WrapperTwo>
    <WrapperThree>
      <WrapperFour>
        <WrapperFive>
          <Component>
            <h1>Finally in the component!</h1>
          </Component>
        </WrapperFive>
      </WrapperFour>
    </WrapperThree>
  </WrapperTwo>
</WrapperOne>
The wrapper hell can make it difficult to understand how data is flowing through your application, which can make it harder to figure out why unexpected behavior is happening.
Complexity
As we add more logic to class components, the size of the component increases fast. Logic within that component can get tangled and unstructured, which can make it difficult for developers to understand where certain logic is used in the class component. This can make debugging and optimizing performance more difficult.
Lifecycle methods also require quite a lot of duplication in the code. Let’s take a look at an example, which uses a Counter component and a Width component.
1import React from "react";2import "./styles.css";34import { Count } from "./Count";5import { Width } from "./Width";67export default class Counter extends React.Component {8 constructor() {9 super();10 this.state = {11 count: 0,12 width: 013 };14 }1516 componentDidMount() {17 this.handleResize();18 window.addEventListener("resize", this.handleResize);19 }2021 componentWillUnmount() {22 window.removeEventListener("resize", this.handleResize);23 }2425 increment = () => {26 this.setState(({ count }) => ({ count: count + 1 }));27 };2829 decrement = () => {30 this.setState(({ count }) => ({ count: count - 1 }));31 };3233 handleResize = () => {34 this.setState({ width: window.innerWidth });35 };3637 render() {38 return (39 <div className="App">40 <Count41 count={this.state.count}42 increment={this.increment}43 decrement={this.decrement}44 />45 <div id="divider" />46 <Width width={this.state.width} />47 </div>48 );49 }50}
The way the App component is structured can be visualized as the following:
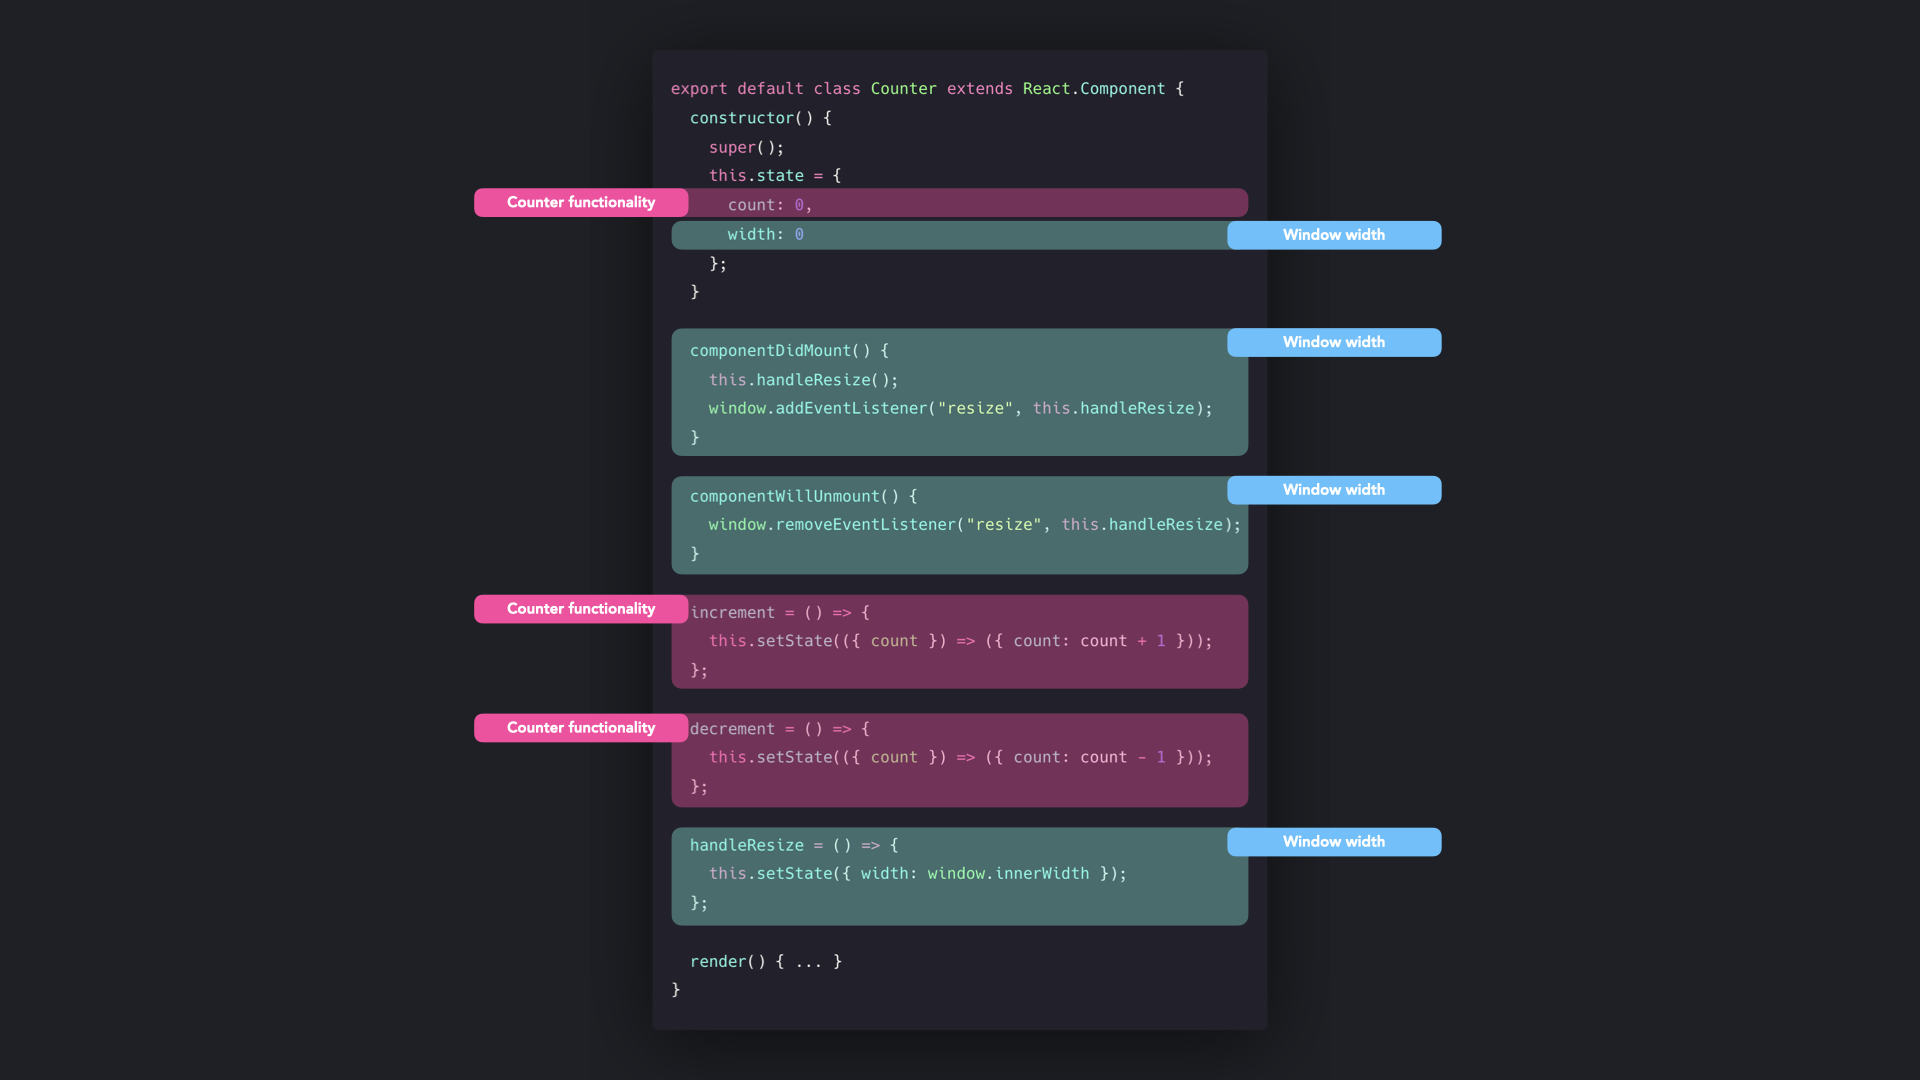
Although this is a small component, the logic within the component is already quite tangled. Whereas certain parts are specific for the counter logic, other parts are specific for the width logic. As your component grows, it can get increasingly difficult to structure logic within your component, find related logic within the component.
Besides tangled logic, we’re also duplicating some logic within the lifecycle methods. In both componentDidMount and componentWillUnmount, we’re customizing the behavior of the app based on the window’s resize event.
Hooks
It’s quite clear that class components aren’t always a great feature in React. In order to solve the common issues that React developers can run into when using class components, React introduced React Hooks. React Hooks are functions that you can use to manage a components state and lifecycle methods. React Hooks make it possible to:
- add state to a functional component
- manage a component’s lifecycle without having to use lifecycle methods such as
componentDidMountandcomponentWillUnmount - reuse the same stateful logic among multiple components throughout the app
First, let’s take a look at how we can add state to a functional component, using React Hooks.
State Hook
React provides a hook that manages state within a functional component, called useState.
Let’s see how a class component can be restructured into a functional component, using the useState hook. We have a class component called Input, which simply renders an input field. The value of input in the state updates, whenever the user types anything in the input field.
class Input extends React.Component {
  constructor() {
    super();
    this.state = { input: "" };

    this.handleInput = this.handleInput.bind(this);
  }

  handleInput(e) {
    this.setState({ input: e.target.value });
  }

  render() {
    <input onChange={handleInput} value={this.state.input} />;
  }
}
In order to use the useState hook, we need to access the useState method that React provides for us. The useState method expects an argument: this is the initial value of the state, an empty string in this case.
We can destructure two values from the useState method:
- The current value of the state.
- The method with which we can update the state.
const [value, setValue] = React.useState(initialValue);The first value can be compared to a class component’s this.state.[value].
The second value can be compared to a class component’s this.setState method.
Since we’re dealing with the value of an input, let’s call the current value of the state input, and the method in order to update the state setInput. The initial value should be an empty string.
const [input, setInput] = React.useState("");We can now refactor the Input class component into a stateful functional component.
function Input() {
  const [input, setInput] = React.useState("");

  return <input onChange={(e) => setInput(e.target.value)} value={input} />;
}
The value of the input field is equal to the current value of the input state, just like in the class component example. When the user types in the input field, the value of the input state updates accordingly, using the setInput method.
1import React, { useState } from "react";23 export default function Input() {4 const [input, setInput] = useState("");56 return (7 <input8 onChange={e => setInput(e.target.value)}9 value={input}10 placeholder="Type something..."11 />12 );13 }
Effect Hook
We’ve seen we can use the useState component to handle state within a functional component, but another benefit of class components was the possibility to add lifecycle methods to a component.
With the useEffect hook, we can “hook into” a components lifecycle. The useEffect hook effectively combines the componentDidMount, componentDidUpdate, and componentWillUnmount lifecycle methods.
componentDidMount() { ... }
useEffect(() => { ... }, [])

componentWillUnmount() { ... }
useEffect(() => { return () => { ... } }, [])

componentDidUpdate() { ... }
useEffect(() => { ... })
Let’s use the input example we used in the State Hook section. Whenever the user is typing anything in the input field, we also want to log that value to the console.
We need to use a useEffect hook that “listens” to the input value. We can do so, by adding input to the dependency array of the useEffect hook. The dependency array is the second argument that the useEffect hook receives.
useEffect(() => {
  console.log(`The user typed ${input}`);
}, [input]);
Let’s try it out!
1import React, { useState, useEffect } from "react";23export default function Input() {4 const [input, setInput] = useState("");56 useEffect(() => {7 console.log(`The user typed ${input}`);8 }, [input]);910 return (11 <input12 onChange={e => setInput(e.target.value)}13 value={input}14 placeholder="Type something..."15 />16 );17}
The value of the input now gets logged to the console whenever the user types a value.
Custom Hooks
Besides the built-in hooks that React provides (useState, useEffect, useReducer, useRef, useContext, useMemo, useImperativeHandle, useLayoutEffect, useDebugValue, useCallback), we can easily create our own custom hooks.
You may have noticed that all hooks start with use. It’s important to start your hooks with use in order for React to check if it violates the rules of Hooks.
Let’s say we want to keep track of certain keys the user may press when writing the input. Our custom hook should be able to receive the key we want to target as its argument.
function useKeyPress(targetKey) {}We want to add a keydown and keyup event listener to the key that the user passed as an argument. If the user pressed that key, meaning the keydown event gets triggered, the state within the hook should toggle to true. Else, when the user stops pressing that button, the keyup event gets triggered and the state toggles to false.
function useKeyPress(targetKey) {
  const [keyPressed, setKeyPressed] = React.useState(false);

  function handleDown({ key }) {
    if (key === targetKey) {
      setKeyPressed(true);
    }
  }

  function handleUp({ key }) {
    if (key === targetKey) {
      setKeyPressed(false);
    }
  }

  React.useEffect(() => {
    window.addEventListener("keydown", handleDown);
    window.addEventListener("keyup", handleUp);

    return () => {
      window.removeEventListener("keydown", handleDown);
      window.removeEventListener("keyup", handleUp);
    };
  }, []);

  return keyPressed;
}
Perfect! We can use this custom hook in our input application. Let’s log to the console whenever the user presses the q, l or w key.
1import React from "react";2import useKeyPress from "./useKeyPress";34export default function Input() {5 const [input, setInput] = React.useState("");6 const pressQ = useKeyPress("q");7 const pressW = useKeyPress("w");8 const pressL = useKeyPress("l");910 React.useEffect(() => {11 console.log(`The user pressed Q!`);12 }, [pressQ]);1314 React.useEffect(() => {15 console.log(`The user pressed W!`);16 }, [pressW]);1718 React.useEffect(() => {19 console.log(`The user pressed L!`);20 }, [pressL]);2122 return (23 <input24 onChange={e => setInput(e.target.value)}25 value={input}26 placeholder="Type something..."27 />28 );29}
Instead of keeping the key press logic local to the Input component, we can now reuse the useKeyPress hook throughout multiple components, without having to rewrite the same logic over and over.
Another great advantage of Hooks, is that the community can build and share hooks. We just wrote the useKeyPress hook ourselves, but that actually wasn’t necessary at all! The hook was already built by someone else and ready to use in our application if we just installed it!
Here are some websites that list all the hooks built by the community, and ready to use in your application.
Let’s rewrite the counter and width example shown in the previous section. Instead of using a class component, we’ll rewrite the app using React Hooks.
1import React, { useState, useEffect } from "react";2import "./styles.css";34import { Count } from "./Count";5import { Width } from "./Width";67function useCounter() {8 const [count, setCount] = useState(0);910 const increment = () => setCount(count + 1);11 const decrement = () => setCount(count - 1);1213 return { count, increment, decrement };14}1516function useWindowWidth() {17 const [width, setWidth] = useState(window.innerWidth);1819 useEffect(() => {20 const handleResize = () => setWidth(window.innerWidth);21 window.addEventListener("resize", handleResize);22 return () => window.addEventListener("resize", handleResize);23 });2425 return width;26}2728export default function App() {29 const counter = useCounter();30 const width = useWindowWidth();3132 return (33 <div className="App">34 <Count35 count={counter.count}36 increment={counter.increment}37 decrement={counter.decrement}38 />39 <div id="divider" />40 <Width width={width} />41 </div>42 );43}
We broke the logic of the App function into several pieces:
useCounter: A custom hook that returns the current value ofcount, anincrementmethod, and adecrementmethod.useWindowWidth: A custom hook that returns the window’s current width.App: A functional, stateful component that returns theCounterandWidthcomponent.
By using React Hooks instead of a class component, we were able to break the logic down into smaller, reusable pieces that separated the logic.
Let’s visualize the changes we just made, compared to the old App class component.
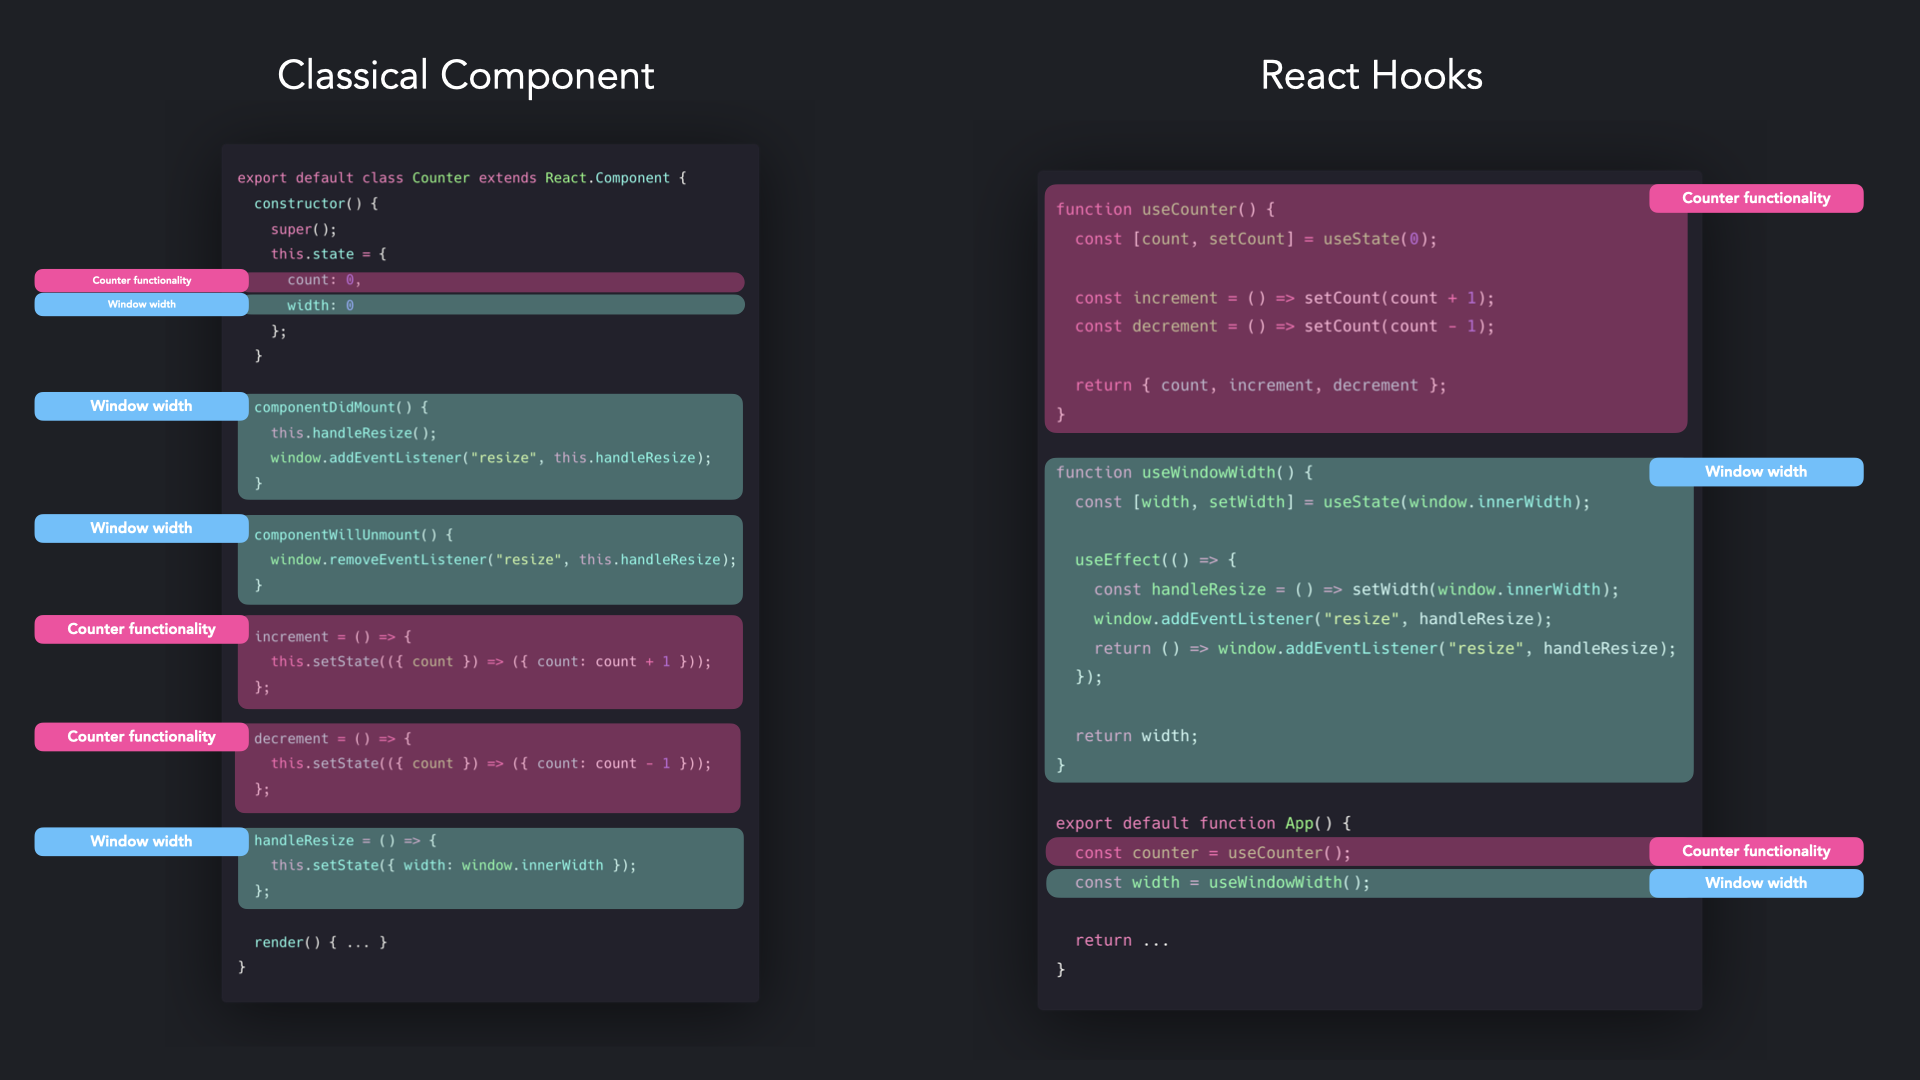
Using React Hooks just made it much clearer to separate the logic of our component into several smaller pieces. Reusing the same stateful logic just became much easier, and we no longer have to rewrite functional components into class components if we want to make the component stateful. A good knowledge of ES2015 classes is no longer required, and having reusable stateful logic increases the testability, flexibility and readability of components.
Additional Hooks guidance
Like other components, there are special functions that are used when you want to add Hooks to the code you have written. Here’s a brief overview of some common Hook functions:
useState
The useState Hook enables developers to update and manipulate state inside function components without needing to convert it to a class component. One advantage of this Hook is that it is simple and does not require as much complexity as other React Hooks.
useEffect
The useEffect Hook is used to run code during major lifecycle events in a function component. The main body of a function component does not allow mutations, subscriptions, timers, logging, and other side effects. If they are allowed, it could lead to confusing bugs and inconsistencies within the UI. The useEffect hook prevents all of these “side effects” and allows the UI to run smoothly. It is a combination of componentDidMount , componentDidUpdate , and componentWillUnmount, all in one place.
useContext
The useContext Hook accepts a context object, which is the value returned from React.createcontext, and returns the current context value for that context. The useContext Hook also works with the React Context API in order to share data throughout the app without the need to pass your app props down through various levels.
It should be noted that the argument passed to the useContext hook must be the context object itself and any component calling the useContext always re-renders whenever the context value changes.
useReducer
The useReducer Hook gives an alternative to setState and is especially preferable to it when you have complex state logic that involves multiple sub-values or when the next state depends on the previous one. It takes on a reducer function and an initial state input and returns the current state and a dispatch function as output by means of array destructuring.
useReducer also optimizes the performance of components that trigger deep updates.
Pros
Fewer lines of code
Hooks allows you group code by concern and functionality, and not by lifecycle. This makes the code not only cleaner and concise but also shorter. Below is a comparison of a simple stateful component of a searchable product data table using React, and how it looks in Hooks after using the useState keyword.
Stateful components
class TweetSearchResults extends React.Component {
  constructor(props) {
    super(props);
    this.state = {
      filterText: "",
      inThisLocation: false,
    };

    this.handleFilterTextChange = this.handleFilterTextChange.bind(this);
    this.handleInThisLocationChange =
      this.handleInThisLocationChange.bind(this);
  }

  handleFilterTextChange(filterText) {
    this.setState({
      filterText: filterText,
    });
  }

  handleInThisLocationChange(inThisLocation) {
    this.setState({
      inThisLocation: inThisLocation,
    });
  }

  render() {
    return (
      <div>
        <SearchBar
          filterText={this.state.filterText}
          inThisLocation={this.state.inThisLocation}
          onFilterTextChange={this.handleFilterTextChange}
          onInThisLocationChange={this.handleInThisLocationChange}
        />
        <TweetList
          tweets={this.props.tweets}
          filterText={this.state.filterText}
          inThisLocation={this.state.inThisLocation}
        />
      </div>
    );
  }
}
Same component with Hooks
const TweetSearchResults = ({ tweets }) => {
  const [filterText, setFilterText] = useState("");
  const [inThisLocation, setInThisLocation] = useState(false);
  return (
    <div>
      <SearchBar
        filterText={filterText}
        inThisLocation={inThisLocation}
        setFilterText={setFilterText}
        setInThisLocation={setInThisLocation}
      />
      <TweetList
        tweets={tweets}
        filterText={filterText}
        inThisLocation={inThisLocation}
      />
    </div>
  );
};
Simplifies complex components
JavaScript classes can be difficult to manage, hard to use with hot reloading and may not minify as well. React Hooks solves these problems and ensures functional programming is made easy. With the implementation of Hooks, We don’t need to have class components.
Reusing stateful logic
Classes in JavaScript encourage multiple levels of inheritance that quickly increase overall complexity and potential for errors. However, Hooks allow you to use state, and other React features without writing a class. With React, you can always reuse stateful logic without the need to rewrite the code over and over again. This reduces the chances of errors and allows for composition with plain functions.
Sharing non-visual logic
Until the implementation of Hooks, React had no way of extracting and sharing non-visual logic. This eventually led to more complexities, such as the HOC patterns and Render props, just to solve a common problem. But, the introduction of Hooks has solved this problem because it allows for the extraction of stateful logic to a simple JavaScript function.
There are of course some potential downsides to Hooks worth keeping in mind:
- Have to respect its rules, without a linter plugin, it is difficult to know which rule has been broken.
- Need a considerable time practicing to use properly (Exp: useEffect).
- Be aware of the wrong use (Exp: useCallback, useMemo).
Note (React 18+): Avoiding Unnecessary Effects
Modern best practices refine how we use effects and event handlers. It’s easy to overuse
useEffect—the new React docs caution: “If there is no external system involved, you shouldn’t need an Effect. Removing unnecessary Effects will make your code easier to follow, faster to run, and less error-prone.” (react.dev)Instead of using an effect to set derived state (e.g.,
useEffect(() => setFullName(firstName + ' ' + lastName), [firstName, lastName])), compute it directly in the component body:const fullName = firstName + ' ' + lastName. Similarly, handle user events like form submission or logging directly in event handlers rather than in effects. This reduces double renders and “stale closure” bugs.Automatic Memoization via React Compiler: New in React 19 is the React Optimizing Compiler (sometimes called React Forget) which can handle many
useCallbackanduseMemooptimizations for you. When enabled, the compiler statically analyzes your component code and automatically hoists stable functions and memoizes values that don’t need to change. The official React docs note that the compiler “handles memoization for you, eliminating the need for manual useMemo, useCallback, and React.memo” in many cases. Writing clean functional components (no side-effects in render, pure computations) will allow the compiler to maximize optimizations.
React Hooks vs Classes
When Hooks were introduced to React, it created a new problem: how do we know when to use function components with Hooks and class components? With the help of Hooks, it is possible to get state and partial lifecycle Hooks even in function components. Hooks also allow you to use local state and other React features without writing a class.
Here are some differences between Hooks and Classes to help you decide:
| React Hooks | Classes |
|---|---|
| It helps avoid multiple hierarchies and make code clearer | Generally, when you use HOC or renderProps, you have to restructure your App with multiple hierarchies when you try to see it in DevTools |
| It provides uniformity across React components. | Classes confuse both humans and machines due to the need to understand binding and the context in which functions are called. |